| |
lecture 7: handout
shape and coords attributes
Remember that to establish the x and y co-ordinates you need to load the map up into Paint Shop Pro or a similar graphics package. All will have some kind of window where information about the image is displayed. In PSP this is to the bottom right:
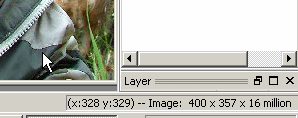
The cursor is pointing to point (328,329). The actual dimensions of this image are 400 × 357. 16 million is the colour depth, by the way.
For each possible value of shape the coords attribute should contain the following information:
- shape="rect". There should be two pairs of x/y co-ordinates, making four numbers. The first two define the top left of the rectangle and the second two, the bottom right. So shape="rect" coords="0, 100, 50, 200" will define a rectangle 50 pixels wide and 100 high, hard up against the left-hand edge of the image, starting 100 pixels from the top.
- shape="circ". You need three figures. The first two are the co-ordinates of the centre of the circle. The last is the radius in pixels. So shape="circ" coords="200, 200, 25" would create a circular hot spot 50 pixels in diameter centred on point (200, 200).
- shape="poly". You need one pair of x/y co-ordinates for each vertex of the polygon (which can be any shape you like - it does not need to be some kind of regular polygon). What basically happens is that the browser draws a line between the point specified in the first pair of co-ordinates and the one specified in the second pair, then another line to the third pair, and so on. The line between the last point and the first point is then implied: you do not need to re-specify the first point. So shape="poly" coords="0, 0, 0, 40, 60, 40" will draw a right-angled triangle in the top left corner of the image.
code for the image map
The code for the "South America" image map used in the lecture is as follows:
<img src="samerica.jpg" alt="A map of South America" height="300" width="218" usemap="#samerica" />
<map name="samerica">
<area shape="poly" alt="Argentina" href="ext_countries.html#argentina" coords="109, 183, 99, 181, 104, 171, 72, 157, 58, 280, 98, 226, 104, 190" />
<area shape="poly" alt="Bolivia" href="ext_countries.html#bolivia"
coords="74, 106, 79, 117, 107, 143, 91, 148, 69, 156, 61, 137, 63, 111" />
<area shape="poly" alt="Brazil" href="ext_countries.html#brazil"
coords="74, 108, 79, 117, 107, 143, 120, 177, 106, 193, 122, 204, 203, 99, 131, 59, 65, 59, 43, 100" />
<area shape="poly" alt="Colombia" href="ext_countries.html#colombia"
coords="20, 60, 57, 75, 66, 40, 38, 22" />
<area shape="poly" alt="Ecuador" href="ext_countries.html#ecuador"
coords="19, 61, 35, 68, 12, 83" />
using the Image Mapper and Image Slicer in Paint Shop Pro
First, you need to see the Web toolbar. Right-click on the toolbar and use the menu options to bring it up. (You may need to move some toolbars around to see it). The Web toolbar looks like this:
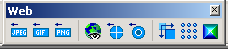
The Image Slicer is the central button (the blue circle with the white cross) and the Image Mapper is on its right (the "target"). (You might also like to have a look at some of the other options on this toolbar. The "optimisers" - the three buttons to the left - give you some useful information on the size, download times, and other possible options for your images.)
Both tools open a largish dialogue box, which look fairly similar to each other. To save repetition I am only going to point out the options available on the Image Slicer. If you get the hang of that one, the Image Mapper will present no problem to you. The numbers on this image refer to the list which follows.
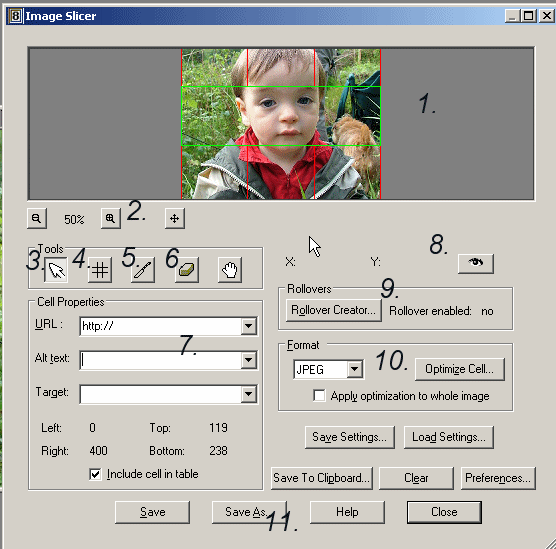
- The main image window. The green cell represents the currently active cell and is selected by no. 3. You can click on one of the boundaries of a cell to make it smaller or larger - there is no separate toolbar button for this - although note you cannot change the size of an active (green) cell.
- Zoom and move buttons, to manipulate how much of the image you can see within the window. The hand in the buttons below performs a similar function.
- Select button - click on one of the cells to make it active.
- Grid button. When you click on this then click in the window, you will be asked how big you want to make the grid in terms of rows and columns. PSP will make all rows and columns of equal size, but you can change this by clicking and dragging in the main window.
- Slice button. Use this to split an existing cell into two.
- Erase button. Use this to erase a line. The active cell you can see in the main image window in this example was created by first creating a 3 × 3 grid, then erasing the vertical lines from the central row.
- Cell properties. Use this to set the destination of the link - it defaults to suggesting an external link but you can just erase this if you want an internal one. ALWAYS include an alt attribute. target is an attribute we have not yet encountered - see lesson 10. This also tells you the size of the cell. You can also remove a cell from the finished image by unchecking the final box.
- Preview button. Will show you a preview of your finished image.
- Rollover creator. See lesson 8.
- Optimiser. This is where you can change the format of bits of the original image, if part of it is more appropriate as a .gif, say. The Optimize button accesses the optimisers already mentioned above.
- File creation buttons. When you're done with the slicing, press Save or Save As and your HTML code will be created. All necessary sub-images will also be saved alongside this code.
This (and the very similar Image Mapper, which should be fairly self-explanatory when armed with these instructions) is a powerful tool and one worth experimenting with. However, I will say again - it does not automatically produce valid XHTML 1.0 nor accessible code. The code it produces can and should be changed. What you should not mess with are the dimensions and attributes of the table.
|
