Web Design |
topic title |
||||||||
main menushelp pagesprinter-friendly/text-only version your accountUse your ACOM account to access the discussion boards, submit course work and check marks and feedback Page Contents |
Image Maps Introduction
Image manipulationThe title of this page rather underestimates the content of the lesson. As well as the technique of image maps, this lesson discusses other techniques for manipulating images on the screen. Because graphics "made" the WWW what it is today, it's unsurprising that programmers, developers and commercial interests all sought ways to enhance the basic graphics capabilities of browsers. This lesson deals with these. But do remember that in the end, these are just additions to the basics - web pages can be perfectly good without getting anywhere near these techniques. You should always remember that not all web surfers can or do load graphics. Nevertheless, these are essential techniques to learn if you have any intentions of being a fully-fledged web designer. As we saw in lesson 5, placing images in your web page involves nothing more complex than adding an <IMG> tag, at least in technical terms - though, as you should remember, there was a lot more thought needed about what made a good image and why it was being placed on screen. But although all the techniques we'll look at in this section are nothing more than elaborations on the <IMG> tag, it's a tag with the potential for a lot of elaboration. There are two main ways this can take place:
As we'll see, these two improvements can also be combined. Once you start using images in this way you will be able to achieve quite professional-looking effects on your web pages. What is an image map?Let's take the second of those two techniques first: making different parts of an image behave in different ways. The most common use of this is when an image is a link. Through associating what is known as a map with an image file, you can make different parts of the image act as a link to different files, or different parts of the same file. Here's a practical example: do follow the instructions and see what it can do before moving on.
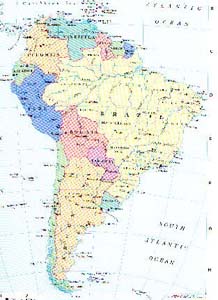
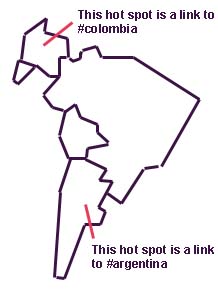
Although all five links were pointing to the same file, they pointed to different anchors within that file and, therefore, were clearly distinct from one another. How was this done? Experience has shown me that the best analogy for the image map is one of those transparencies that you use on overhead projectors. Imagine a map of South America in an atlas. You could lay a transparency over the top of the atlas and use a felt-tipped pen to draw around the countries used here (or indeed all of them). Imagine then that those felt-pen outlines are turned into links or, in correct terminology, hot spots. You therefore keep the image as it was before (left), but overlay it with a map (right) in which some hot spots have been drawn out and linked to different parts of the file ext_countries.html (only two shown here for clarity):
Though the hot spots clearly corresponded to "shapes" in the original image (e.g., the countries' borders), this didn't have to be the case. I could have equally applied a map that had three or four circular hot spots drawn in essentially random locations. The point is that though the original image and the map will have some relationship with each other, they remain essentially separate entities, just as would a page in an atlas or other book, and a transparency laid on top of it. The fact you can see the former through the latter is not really relevant. Uses and abusesThe pages on the USEMAP attribute, the <MAP> tag and the <AREA> tag describe how to create image maps and code them within HTML. This section discusses a few of the ways the technique can be used well - and, as ever, used badly. Beyond the fact that they need to be used as links, the applications of image maps are unlimited - because, as I've said, you can take any image and turn it into a map, and you can draw the hot spots where you like. But the most common ones are as follows:
As I said, the possibilities are huge. However, there are some definite drawbacks to doing things this way, and you should bear these in mind. Do remember that not all users can - or want to - see images. And also, if the shapes of hot spots do not obviously correspond to shapes in the underlying image (or even sometimes if they do), there is no outward indication a hot spot is there unless and until the cursor is placed over it. Was it easy to tell (before looking at the linked file) which five South American countries I'd used? I'll bet most of you ended up at Brazil or Argentina first; how many of you ended up reading about Ecuador first? Between them these two factors make it essential that you provide some kind of alternative way of reaching the relevant information (even if nothing more sophisticated than the scroll bar). The image map is a useful way of relating links to some kind of visual guide; such as the example of linking information to a real map, or a diagram. But if used as a gimmicky menu alone, you run the risk of preventing people ever finding half your site, if they either miss a particular hot spot, or can't view the image in the first place. (Though the image and the map are essentially separate, the map won't work without the image.) This factor means that image maps, though they can be great if well used, are and always will be garnish. More is said about this in lesson 10, on navigation and menus. SummaryAs well as the three topic pages directly related to image maps, there is also a page on the related technique of multipart images which I've mentioned a few times so far. This can be combined with the technique known as rollover images to produce some quite sophisticated graphical effects; and if learning about rollovers you will also need to learn how to preload images using JavaScript. Only the introductory lessons (1-5) had actual exercises for you to perform, but I hope this lesson and the next give you some inspiration. Remember, though, it is a bad idea to make an image map the only means of navigating around your site or of accessing certain information. They can be very irritating if used badly, particularly when important hot spots are simply impossible to find because they're too small and/or they don't particularly relate to features on the underlying image. You're required to construct an image map in your coursework to display your understanding of the techniques, but in other pages you may go on to write, they are far from obligatory: think about how to use them well. The same goes for rollover images, and indeed every other one of these advanced techniques. | ||||||||
Material on this site is © Drew Whitworth, 2005 Permission will usually be given to reproduce material from this site for non-commercial purposes, if credit is given. For enquiries, e-mail Drew at andrew [dot] whitworth [at] manchester [dot] ac [dot] uk.