Calibration of Hearing Aid Test Boxes
One simple way of checking a hearing aid test box is to remove the coupler and check that the measured output is what it should be! If you don't get sensible results it needs calibrating (assuming there is nothing else obviously wrong). This checking process involves removing the coupler from the measurement microphone and putting it next to the reference/control microphone. The lid is then closed and a then whatever signal you select should give the expected reading on the screen. For example a 65dB SPL pure-tone should give a single point on the screen at 65 dB SPL of the chosen frequency. If a tone-sweep is selected then a flat line at the appropriate level should be produced. It is adviseable to carry out such a check on a daily basis if test box measurements are used.
A simple check of test-boxes
Figure 13 - example of a simple test-box check
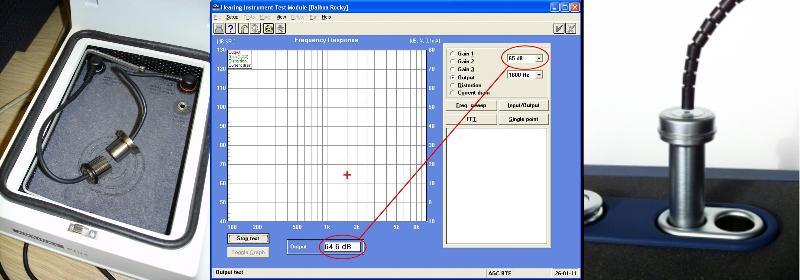
Figure 13 - Checking a test box. The 2cc coupler is removed from the measurement microphone and the two microphones placed close together (left for Aurical I; right for Audical II). The lid is then closed and a signal played out. In this example a 1600Hz tone at 65 dB SPL is selected and the measured signal comes out at 64.6 dB SPL in this example - close enough! If a tone-sweep is selecetd then a flat line o fth ecorrect level should be displayed. If the reading is at an incorrect level then calibration/adjustment is needed. Please note that this procedure is described in the manual fo rthe Aurical II test box.
Test box calibration
If the above checks show that the test box is not giving the correct reading, or the time has come for a more calibration then a similar procedure is used for calibrating a sound level meter. The actual procedure and menus used will depend on the test box. Some equipment will require special codes to enter the calibration menus of the software. Full test-box calibration is typically not accessible for users and the recommendations are that this is carried out by returning the device to the manufacturer or an accredited calibration service. The figure below shows the basic process for an Aurical I test box.
Figure 14 - test box calibration
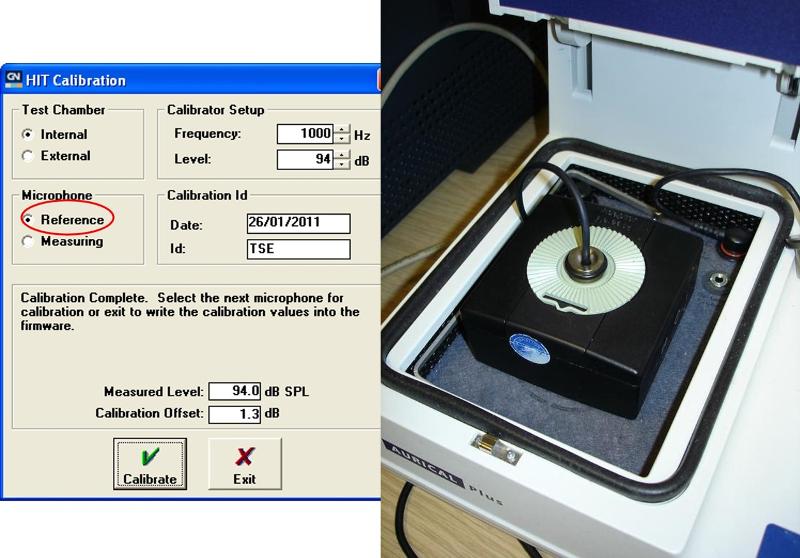
Figure 14 - The test box calibration is a simple process if access to the software menu is granted. This example shows the menu for an Aurical I test box. A sound level calibrator (same as those used for SLMs) is used to present a known signal (e.g. 94 dB SPL at 1kHz) to the selected microphone. The microphone measures ths signal and a desired offset produced to correct for any differences. This is then repeated for the other microphone.