Audiometer Calibration - Pure-tone air-conduction with supra-aural headphones.
(Presentation at bottom of page)
Equipment
For this calibration procedure basic requirements would be:
- Pure-tone audiometer with headphones (TDH39/49 used in this example) - make sure that it is all working and that you get the expected sound out of the correct earphone
- Class 1 sound level meter
- Sound level calibrator (or pistonphone)
- Appropriate coupler (Ear simulator - BS EN 60318-1; or 6cc coupler - BS EN 60318-3)
- RETSPL values for the appropriate coupler and headphone combination (BS EN ISO 389-1)
(references given below)
Expected Values
Once the equipment is assembled and the calibration of the SLM checked (see presentation) you need to calculate what dB SPL you could expect to get given what you set the audiometer dial to. Remember that the RETSPL is the number of dB SPL that you would expect with that coupler/headphone combination for 0 dB HL.
To ensure a good signal-noise ratio we set the audiometer to 70 dB HL
If we are using TDH39 Headphones and a Ear simulator (BS EN 60318-1) then the RETSPL values are given in the table below:
Table 1 - Example RETSPL values
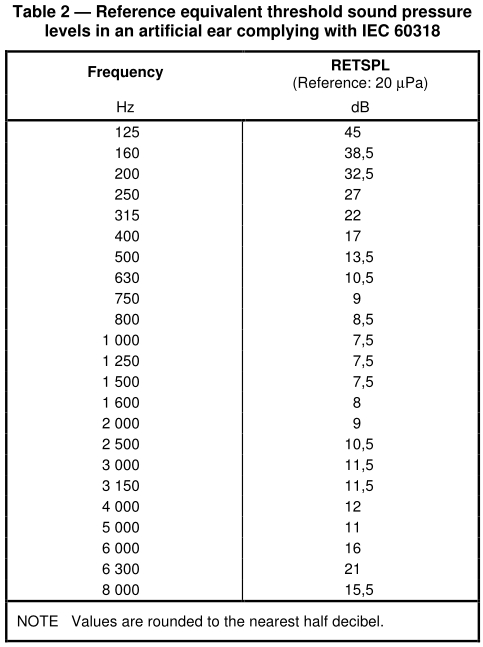
Table 1 - RETSPL values for supra-aural sounds measured using an artificial ear that complies with BS EN 60318-1. This table gives the value in dB SPL at each frequency that corresponds to 0 dB HL (measured with this coupler). Thus, at 1000Hz, 0 dB HL on the audiometer dial should produce 7.5 dB SPL (if we could measure at levels this low).
So we know that 0dB HL at 1kHz corresponds to 7.5 dB SPL, thus for a dial reading of 70 dB HL we would expect 77.5 dB SPL
Or at 125 Hz for a dial of 70 dB HL we would expect 115 dB SPL. Because of the range of levels across frequency we may find that we have to change the range setting on the SLM.
Procedure
Now that we have the equipment set up and we know what values we should be getting we can make the measurements.
- Set up equipment
- Set SLM to dB(Z) or linear frequency response
- Check sensitivity of SLM with sound level calibrator
- Set Audiometer to 70 dB HL (can use 60 dB HL, but would need to adjust expected values)
- Listen to Audiometer to make sure signal is OK
- Place earphone centrally on coupler with 4.5N force applied
- Measure sound level on SLM
- Compare measured reading with expected
- Change frequency and repeat measurements (repeat for other earphone)
- If readings more that 3.7 dB (125Hz-4kHz; 6.2 dB up to 8 kHz BS EN 60646-1:2015) apart then audiometer needs adjusting
Sources of Error
Asuming calibration was OK – some examples from past practical sessions:
- No signal – equipment not set up correctly (e.g. wrong earpiece on coupler, wrong channel selected, broken cables or equipment …, not turned on!)
- Signal audible but reading way too low:
- Damaged headphones
- Headphones not positioned correctly
- Wrong filter settings on measurement system (e.g. A-weighting selected, or peak on spectrum analyser not selected)
- External noises influencing measurements
- Make sure that you listen at the same time as making the measurements – can you hear extraneous noises, even if they are outside the room?
- Are you making extraneous noise – do you have your hands on the table? Are you talking?
- Is your mobile phone interfering with the equipment (even if it isn't ringing!)?
References
- BS EN 60318-1:2009 Electroacoustics. Simulators of human head and ear. Part 1: Ear simulator for the measurement of supra-aural and circumaural earphones
- BS EN 60318-3:2015 Electroacoustics. Simulators of human head and ear. Part 3: Acoustic coupler for the calibration of supra-aural earphones used in audiometry
- BS EN ISO 389-1:2013 Acoustics. Reference zero for the calibration of audiometric equipment - Part 1: Reference equivalent threshold sound pressure levels for pure tones and supra-aural earphones