Introduction
This section gives a basic overview of the calibration procedure, concentrating on pure-tone calibration with supra-aural headphones. Later sections will take you through different types of calibration procedures.
Why do we need calibration?
Calibration is a necessary part of using any audiological equipment, whether it is routine equipment such as Audiometers or specialist equipment used for research projects only.
- Need to know what you are getting/producing
- Need to know that equipment is doing what it is supposed to do
- Need to be able to verify that it is the same as other equipment
Figure 1 - Examples of Audiometers

Figure 1 - Examples of different types of audiometers that need regular calibration to ensure that they are fit for the purpose of testing hearing. The type, complexity and features of each device will require different ranges of measurements, but the same principles will apply to calibrating each device.
By following the appropriate standards and calibration procedures we can be sure that audiometers throughout the country (or world) would produce the same thresholds in an individual subject. Or if we are carrying out a research project others would be able to exactly replicate what you have done.
What do you want to measure?
It is important that you know what you want to know!
Are you simply interested in the level of a pure-tone in dB SPL or:
- Do you need to convert to dB HL
- Do you need to measure the frequency of the signal
- Do you need to measure the duration and shape of the signal envelope?
- Do you need to measure the background noise, distortion, electrical interference etc.
What you want to measure determines the equipment you need and your approach to calibration.
What equipment do we need to carry out calibration?
Lets think of a basic examples first – calibrating a pure tone sound produced by a particular system:
How is the sound delivered (inserts, supra-aural, circumaural or free-field) this will determine how we couple the microphone to the sound production system
e.g. 2cc coupler, IEC711 coupler, 6cc coupler, Artificial ear, what *RETSPL values will we need.
*RETSPL = reference equivalent threshold sound pressure levels - see below.
Figure 2 gives examples of the sort of microphones/couplers you might need. If you are measuring free-field presentation then you will need a free-field microphone on your sound-level meter, if you are calibrating an audiometer with TDH39/49 supraural headphones then a 6cc ear simulator such as a B&K4152 with a 1" pressure microphone. If you want to calibrate other headphones you may need a B&K 4153 coupler that has a flat plate adaptor for super-aural headphones. Whichever coupler you use (and headphones) will determine what RETSPL you use to convert dB SPL to dB HL.
Figure 2 - examples of microphones and couplers
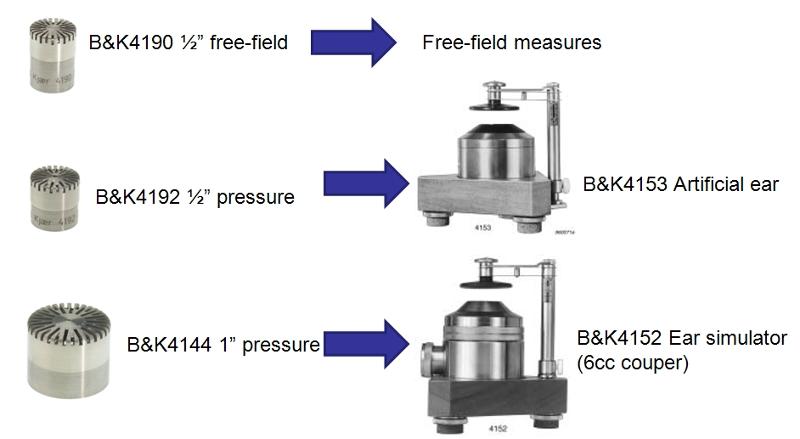
Figure 2 - examples of microphones and couplers that might be used to measure audiometer output for calibration purposes.
Depending on what it is you want to measure you will also need an appropriate measureing device:
- Do we just want to measure the dB SPL - if so probably just need a SLM connected to the appropriate microphone and coupler
- Do you want to measure the frequency also - if so you will also need to be able to connect the SLM output to a frequency counter.
- Do you want to measure the waveform envelope - if so you will need to be able to capture the waveform on an oscilloscope
- Do you want to measure the shape of the spectrum or 1/3-octave analysis of the signal - in oder to do this you will need a spectrum analyser
Figure 3 - examples of equipment for AC audiometer calibration
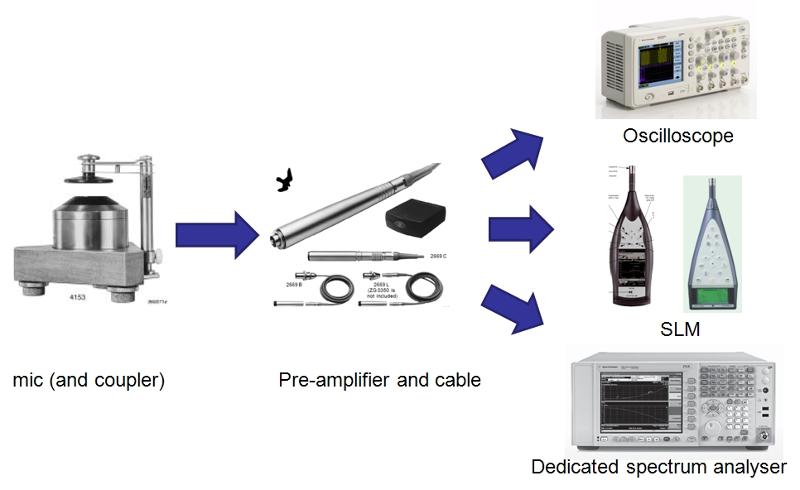
Figure 3 - the microphone and coupler transduce the acoustic signal from the audiometer (via supra-aural headphones in this example). These are then connected via a pre-amplifier and cable to a device for displaying and measuring the electrical signal. This may be an oscilloscope to show the waveform and make calculations from that, or a sound-level meter or spectrum analyser to give dB SPL values or show the signal spectrum.
Calibrating the measurement system
Once you have connected the measurement equipment together you will need make sure that it is giving the correct reading i.e. if you put a known signal into it does it give the correct reading?
This is usually done by playing a known signal into the measurement system using a sound level calibrator (94 dB SPL at 1 kHz) or a pistonphone (124 dB SPL at 250 Hz) and then adjusting the sensitivity of the measuring device so that the display gives the correct reading.
(Use an appropriate calibrator if available – e.g. if you are using a 250Hz calibrator but your system will be used at 16kHz the measurements probably won't be correct!)
Below are pictures of a sound level calibrator, a pistonphone and a multi-frequency calibrator.
Figure 4 - Sound level calibrators
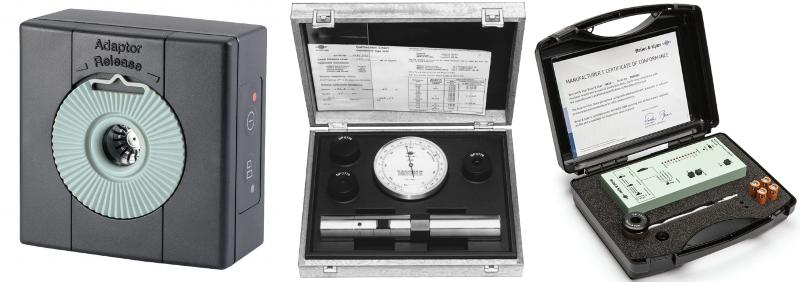
Figure 4 - 3 different examples of reference sound sources that can provide a known sound level at specific frequencies to allow our measurement system to be calibrated. From left right we have:
- Sound level calibrator - produces 94 dB SPL at 1kHz set up for calibrating a 1/2 inch microphone (the green insert can be removed to calibrate a 1-inch microphone.
- Pistonphone - produces 124 dB SPL at 250Hz for either a 1/2" or 1" microphone.
- Multifunction Acoustic Calibrator which allows a range of different sound frequencies and levels to be used for calibration.
So, for example, if you have a 1/2" microphone attached to a sound level meter and play out a 94 dB SPL tone at 1kHz, the sound level meter should read 94 dB SPL if it is correctly adjusted. If this is the case then you can now use this system to measure the output of the audiometer (or other device) that is to be calibrated. However, we first of all need to think about what signal level we should be getting - for example if our audiometer is set to 0 dB HL on the dial, what dB SPL does this correspond to - after all, our measurements are in dB SPL, not dB HL.
RETSPL - Reference Equivalent Sound Pressure Levels
So we now need to think about is what levels do we expect? If we are calibrating for puretone air conduction audiometry with TDH39 headphones an a B&K4152 6cc coupler we need to know what dB SPL measured on the coupler should correspond to 0 dB HL (as it is HL we set on the auriometer dial). To find this out we need to look at the appropriate standards to get this RETSPL value. In this example it would be part 1 of BS EN ISO 389.
The RETSPL value is the dB SPL that corresponds to 0dB HL for a given headphone/coupler combination. This set of values is obtained from the measured thresholds in otologically normal young adults. These reference values depend on the type of transducer, the type of coupler/artificial ear being used and the type of signal being used. The values are given in the various parts of BS EN ISO 389.
- BS EN ISO 389-1:2018 Acoustics. Reference zero for the calibration of audiometric equipment - Part 1: Reference equivalent threshold sound pressure levels for pure tones and supra-aural earphones
- BS EN ISO 389-2:1997 Acoustics. Reference zero for the calibration of audiometric equipment - Part 2: Reference equivalent threshold sound pressure levels for pure tones and insert earphones
- BS EN ISO 389-3:2016 Acoustics. Reference zero for the calibration of audiometric equipment - Part 3: Reference equivalent threshold force levels for pure tones and bone vibrators
- BS EN ISO 389-4:1999 Acoustics. Reference zero for the calibration of audiometric equipment - Part 4: Reference levels for narrow-band masking noise
- BS EN ISO 389-5:2006 Acoustics. Reference zero for the calibration of audiometric equipment - Part 5: Reference equivalent threshold sound pressure levels for pure tones in the frequency range 8 kHz to 16 kHz
- BS EN ISO 389-6:2007 Acoustics. Reference zero for the calibration of audiometric equipment - Part 6: Reference threshold of hearing for test signals of short duration
- BS EN ISO 389-7:2019 Acoustics. Reference zero for the calibration of audiometric equipment - Part 7: Reference threshold of hearing under free-field and diffuse-field listening conditions
- BS EN ISO 389-8:2004 Acoustics. Reference zero for the calibration of audiometric equipment - Part 8: Reference equivalent threshold sound pressure levels for pure tones and circumaural earphones
- BS EN ISO 389-9:2009 Acoustics. Reference zero for the calibration of audiometric equipment. - Part 9: Preferred test conditions for the determination of reference hearing threshold levels
Calibrating
So now we have a calibration system assembled and calibrated, we know what dB SPL we should be getting if the audiometer is set to 0 dB HL and so we can start our measurements. First of all though we need to think about background noise - if we set the audiometer dial to 0 dB HL then it is unlikely that we will get a sensible reading from the sound level meter because the reading will be contaminated by background noise. To get round this we usually set the dial to 60 or 70 dB HL to get a good signal-noise ratio.
0dB HL + RETSPL = expected dB SPL corresponding to otologically normal threshold
70dB HL + RETSPL = expected dB SPL corresponding to 70 dB HL
So we know what we should be getting at a particular frequency, we now make the measurements of the dB SPL from the headphones and compare with what we would expect. If the difference is less than 3.7 dB (125Hz-4kHz; 6.2 dB up to 8 kHz BS EN 60646-1:2015) then we can accept the audiometer as being in calibration (at that pure-tone frequency and level, for for that transducer only) - we now need to repeat at all frequencies for left and right, both AC and BC, supra-aural and insert-earphones and masking as well!
In later sections we will look at some of these different aspects.
What can go wrong?
Asuming that the calibration of the measurement system was OK then there are a range of things to think about before assuming that the audiometer needs adjusting:
- No signal – equipment not set up correctly (e.g. wrong earpiece on coupler, wrong channel selected, broken cables or equipment …, not turned on!)
- Signal audible but reading way too low:
- Damaged headphones
- Headphones not positioned correctly
- Wrong filter settings on measurement system (e.g. A-weighting selected, or peak on spectrum analyser not selected)
- External noises influencing measurements
- Make sure that you listen at the same time as making the measurements – can you hear extraneous noises, even if they are outside the room?
- Are you making extraneous noise – do you have your hands on the table? Are you talking?
- Is your mobile phone interfering with the equipment (even if it isn't ringing!)?