Web Design |
basic table tags and structure |
|||||||||||||||||||||||||||||||||||
main menushelp pagesprinter-friendly/text-only version
|
This isn't that long a page, but it's an important one, which is why it's been assigned as pre-reading for lecture 4. If you can at least become familiar with the basic pattern of table tags, it will be very useful to you. Tables seem difficult but aren't, really - as long as you've got the basics firmly affixed in your mind. why tables?Browsers work in what is called a "line mode" fashion, following the pattern of the very first browser, programmed by one of Tim Berners-Lee's students, Nicola Pello (unfortunately not a rare instance of gender equality in the Web's creation - Italians give their men names like Nicola, and Andrea). That is, they render things quite simply, line by line, with the top of the HTML file equating to the top of the screen, and so on down to the bottom. Sounds perfectly logical, I know, but the point is that sometimes you want to render things across the screen: objects or paragraphs side-by-side, instead of above-and-below. Those responsible for HTML realised that there was a need to be able to arrange things side-by-side, for reasons no more complex than being able to offer simple tabulations, like this:
This could, conceivably, be done with <pre> tags, but you would lose presentation elements like the bold text. To lay things out side-by-side like this, therefore, something more is needed. The solution was the family of table tags. Tables turned out to have uses beyond just laying out two-dimensional arrays (or grids) of information. The advantage comes that anything can go into a table "cell". Layouts like this become easy:
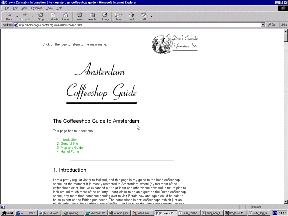
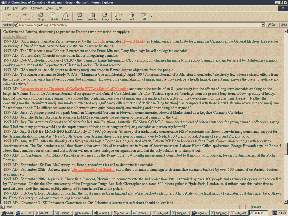
It is, just about, possible to do this without using tables but it's a lot easier with them. More usefully, tables also provide a way to get "white space" on your page and, thereby, start laying out web pages with the same sophistication as printed material (though always with that extra flexibility). "White space" is publishing terminology for portions of a page that have no content. They don't have to be white. If you look to the left of this paragraph you'll see an expanse of "light green space", for instance, but the idea is the same. You very rarely see substantial white space in printed books; magazines might make use of it, but newspapers rarely do (as it's uneconomic - better to bung an advert in there). On the Web, however, white space is very important. It's very wearing to read text that goes all the way from one margin to the other, without a break. This particularly applies if screens are quite high-resolution; a screen width of 1000+ pixels (not so rare these days) might end up displaying 40 or 50 words on each line, if the text size is small. Compare these screen shots:
These are shots of pages I'm familiar with, and while I know the information on the second page is of high quality, it's a rather wearing experience to read. I'm not claiming tables are a doddle - they're not. They're certainly the hardest technique you'll come across in basic web design. But they are necessary, and the work involved in understanding them will be repaid as they can be extremely powerful tools when well used. Once you can use tables properly, you can design for the Web. It's as simple as that. main table tagsThe other tags we have investigated up to this point are pretty straightforward. You decide what formatting you want to apply to a piece of text and surround it in start and end tags, or you want to insert an object on the page so you just throw in a <br /> or similar tag. Tables are a little more complicated. They are not formed from just one tag, but from at least three different tags which work in conjunction to create the table. The three compulsory table tags are: <table> There are other tags which can be used as well as many table attributes and style sheet properties but let's not worry about them for a while (see the page on more complex tables). For now we will just concentrate on how these three tags work together to define the table layout. The easiest way to explain this is to show you by example, so have a look at the table on the left below, which has been defined by the HTML on the right (any attributes used have been removed at this stage for clarity):
First of all note how the whole table is bounded by the start and end <table> tags. Then we set about dividing the table up. Think about how we read text from a book (in English, anyway); we start at the top left, read from left to right, and do not move onto the next line until we have reached the far right of the current line. It is the same with tables - we define one line or row of the table at a time. So this is the next level of division, using <tr> or table row tags. Look closely at the example. Notice how the second level of structure, the <tr> tags, separate the rows from one another rather than the columns. Once we have separated the rows in this way the last task is to separate each "cell" of the row from each other. This is done with the <td> tags (short for "table data"). The actual contents of any given part of the table always appear between start and end <td> tags. And anything can appear in a table cell - text, images, links, even other tables. Although there are many more things that can be done with tables they always have this same basic structure. We will see on the page about more complex tables that they do not have to be regular grids and you have a lot of control over the size of table cells. But however complex a table gets the basic structure always remains the same; those three tags always do the work.
If this is your first visit to this page you should now go and follow the virtual lecture which will elaborate on how useful tables are and how you can use them to begin thinking about the graphic design of your web sites. | |||||||||||||||||||||||||||||||||||
Material on this site is © Drew Whitworth, 2005 Permission will usually be given to reproduce material from this site for non-commercial purposes, if credit is given. For enquiries, e-mail Drew at andrew [dot] whitworth [at] manchester [dot] ac [dot] uk.