lecture menu |
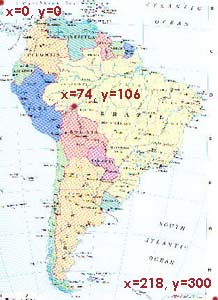
lecture 7: getting helpThe last slide mentioned the issue of co-ordinates - pairs of numbers which specify points on the images. But where do you get these numbers from?
If you use Paint Shop Pro you can see that when your cursor is over an image, the bottom right hand corner of the screen will display the exact x and y co-ordinates of the point you're over. (I would love to show you a screen shot of this but it's quite awkward to get Paint Shop Pro to take screen shots of itself!). You can note these down with a pencil and paper and type them in manually, if you want. However, Paint Shop Pro also has a useful Image Mapper tool. It is not quite as essential as the "Image Slicer" (discussed in a few slides' time) but can still be a time-saver particularly if you are doing a very complex image map, like the map of the world referred to earlier. See the handout for details. Remember that you do not need to be absolutely precise when tracing out a hot spot. When doing faces, for instance, just do a circle - you don't need to trace round ears, chins, hairlines... The only thing you need to watch is that hot spots don't overlap. If they do, bear in mind that the hot spot which is later in the code will override any defined earlier in the code, if their spaces do overlap. That's it for image maps, although you should go and read the online teaching materials and, as ever, practice! However, there is another way by which you can give images a bit more depth, and that is covered in the next part of the lecture. |