Web Design
Lesson 3: Printer-Friendly version
As with the other similar pages on this site, this page is designed to be easily printed out and read offline, away from the computer. If you are trying to follow this lesson online you will find it much more convenient to return to the full lesson 3 menu.
You can also go straight to the printer-friendly version of lesson 4 from here.
Contents
- 3.1 the <A> tag
- 3.2 link styles: pseudo-classes
- 3.3 internal links
- 3.4 external links
- 3.5 mail-to links
- 3.6 anchor links
- 3.7 non-HTML and special links
- 3.7.1 image files
- 3.7.2 word documents or Adobe PDF files
- 3.7.3 video files
- 3.7.4 audio files
- 3.7.5 executable files and other file types
- 3.8 navigation tips
3.1 the <A> tag
The <a> seems illogically named. A in fact stands for "anchor". The reference is to "anchor points" in cyberspace: points in the trillions of online words which browsers can "hold on to" (usually, but not always, the starting points of pages). However, this original terminology is now usually applied only to a subset of links, the "intrapage", or anchor links (see 3.6).
Actually, the "a" is better thought of these days as standing for active. Placing a passage of text within <a> tags turns it into an active piece of hypertext. This idea was introduced in the virtual lecture, so I need say no more about it here.
Basically, "activating" some text has two effects:
- it changes the appearance of the text. On this site, links are obviously blue and underlined. We talked a lot about styles in lecture 2 so it shouldn't need repeating that this is stylistic information and goes in the style sheet. However, styling links is slightly more complicated than styling other forms of text, for reasons revealed in this lesson (3.2).
- it creates a hypertext reference to another "point" in cyberspace. This is structural information, not stylistic, so cannot be done in the style sheet. As this is the more important aspect of the <a> tag, most of the rest of this lesson will deal with it.
Note that the <a> tag is an inline tag. Even if your link stands in its own paragraph (like the menus of links which occupy the top left of these pages), you should still include them in a <p> (or other block-level) tag.
When the user clicks on the link, the browser is instructed to move to the specified point. Except in the case of an anchor link within the same file (see 3.6), this point will be reached by the browser loading another HTML file. So, obviously, it is necessary for you to tell the browser which file to go and load. There are three possibilities here, and each is dealt with in a section of this page:
- a link to another HTML file in the same web site. This is known as an internal link (3.3).
- a link to an HTML file in a completely different web site. This is an external link (3.4).
- a link to a non-HTML file (3.7).
As a final special case you can also create a link that enables the user to send a mail to you, as the author of the page (or indeed to anyone else). This is known as a mail-to link (3.5).
In each case you pass the necessary information to the browser via the attribute href (which stands for "hypertext reference"). The value of href, enclosed within quotes as always, is that of the destination of the link. Each of the topic pages referred to above describe what values href must take for each link type.
When you're using a link you In each case you can have some idea of where the link will take you by looking down at the bottom of the browser window, in the status bar, as your mouse hovers over the link. See the screen shot below:
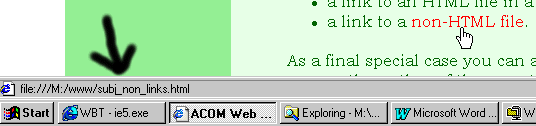
It is best not to depend entirely on this information, however; URLs and filenames are not always clear guides to what lies at the other end of the link, and anyone intending to follow a link will also benefit from clear information in the text of the link itself. I have said more about this in the final section of this page (3.8).
Finally, note that although the <a> tag is in some ways a fairly normal tag - in that it formats the text contained within it in certain ways - it can also be used to turn images into links. And there are several other options for links as well, covered in the Advanced Web Techniques lessons (particularly lecture 7). Perhaps all this seems a bit like overkill, but I'll say it again - links ARE the WWW. Everything else you might see on the Web could be presented in other formats, whether print, sound, vision or whatever. But links are unique to it, and the better they're used, the better your site will be.
3.2 link styles: pseudo-classes
This week's lecture dealt more with conceptual stuff than practical, and only mentioned the styling of links very briefly. It's important you know how to do this, however: firstly and obviously because it's an important element of your page's appearance (very few pages have no links at all). Second, because it forms a kind of stepping-stone to a more sophisticated use of style sheets than we've managed so far. So please read this page carefully and practice what you read on your own site.
Applying styles to links is done in broadly the same way as for other tags. Place the style definitions in the style sheet under the heading, "a". Links will inherit properties off whatever block-level tags they are included in, so it is relatively common that all you define in the style sheet is the colour of links. The style sheet definition for this site's links is, from one point of view, simple:
{ color: #0000FF; }
You can, of course, define your links to have a different font style. (Partly this is how I get the links on the left of these pages to appear in a monospace font, although not exactly: see the section on classes in lecture 4.) I would not recommend defining them to have a different text size. As they are inline tags, this could make your page look untidy.
Note that all browsers default to showing links with an underline. It is not therefore necessary for you to do this with your style definitions of <a> tags:
{ color: #0000FF;
text-decoration: underline; }
...although you could, if you wanted, do this:
{ color: #0000FF;
text-decoration: none; }
If you do (or even if you leave the underline in), make sure your link colour is clearly distinguished from the rest of the text! Having to hunt around for links is one of the badges of bad web design. This is perhaps the most important recommendation for good link use: others can be found in 3.8 below.
I've deliberately avoided including the tag name in the style sheet definitions above. There is an added level of complication with defining styles for <a> tags. It's not an arbitrary one though: in fact it's a useful introduction to the idea of classes of styles. This is when, in different circumstances, different style definitions can be applied to the same tag. We've already seen the use of ad hoc styles (2.1.3), but if you want to use an ad hoc style more than once the style attribute starts to become cumbersome.
Why do you need this with links? Mainly because a convention has developed that links have more than one "state". Browsers can be instructed to show links in a different way if the user has already visited the page. You have probably noticed by now that this site shows link text in a slightly darker blue if this is the case. (How does the browser "know" this? The answer is to do with a facility called the cache, which we will mention in lecture 6. It's the cache that, for instance, means your Back button works.)
Links that have not been visited are therefore one "class" of links, and links that have been visited are another "class". And each of these classes can have a different style applied to them. With full classes - discussed, as I've said, in lecture 4 - you have to decide when to apply one class or the other. But with pseudo-classes, which is what links used, you leave it up to the browser to decide. In each case you can define a separate pseudo-class of the <a> tag's style definition.
The upshot of all this is that you invariably need at least two style definitions for the <a> tag. Here is a random example (not drawn from any site in particular:
a:link { color: #ff0000;
text-decoration: none; }
a:visited { color: #ff7700;
text-decoration: none; }
As ever, be exact. Use only a colon after the "a" and don't put spaces in there. Anyway, this would render unvisited links in red, and visited links in orange: both without underlining.
It is not obligatory that you choose a different colour for visited links, but even if you want the two pseudo-classes to be the same, define both in the style sheet. If you do not define one of these the browser will apply its default colouring. Most browsers are set up to show links in blue and visited links in purple. If, say, your site has a dark background and you define your unvisited links as yellow, that's fine: but if you don't at the same time assign properties to a:visited the browser will revert to its default and you may find your links becoming very hard to read once the pages make their way into readers' caches.
There is a third pseudo-class which is very useful, and here is an example:
a:hover { text-decoration: underline; }
"hover" does not work on all browsers but it's useful to include it anyway. Again you should have noticed by now that there is a third colour for links on this site, a paler blue which is applied only when your mouse pointer is "hovering" over a link. If the example just given were combined with the a:link and a:visited pseudo-classes already noted, this would cause the underline to "reappear" during a hover. Some people even define a different background colour to appear during a hover. (Don't change the font size or type though: this can cause unsightly "jumping" of text on the screen. ) a:hover inherits properties off the other two classes (which are mutually exclusive, as you may have deduced) so you only need to define whatever it is that has changed. By the way, a:hover does not seem to work unless it is placed after the other two "a" definitions in the style sheet.
(In fact there is a fourth class, "a:active", but I find this limited in application and never use it.)
As ever the best way to get the hang of all this is to practise on your own site. As the lecture noted, your first course work is fairly imminent and you are expected to use links in that work, and style them appropriately, so it's a good time to start!
appendix: some other pseudo-classes
While we're on the subject, there are a couple of other pseudo-classes, or pseudo-elements. These are first-line and first-letter which can apply to the <p> tag. Of course, if you want to apply formatting to the first letter of a paragraph this may be something to only do on special occasions - such as this paragraph.
Theoretically, and I use that word very advisedly, that effect could be produced by a style sheet entry similar to this one:
p.firstpara:first-letter { font-size: xx-large; color: #ff0000; float: left; }
I haven't specifically mentioned the float property elsewhere: this is its only appearance in this site. Without it, you'd have the letter standing above the text (which would also have been a reasonable effect). In any case I also have to admit I've cheated and not used the "first-letter" pseudo-class, as that remains unreliable - I've done it with a style attribute within a <span> tag enclosing that initial W. Not only that, but those viewing this page on some older browsers are probably wondering what I'm yammering on about because to them, that first paragraph probably looks like all the others. Pseudo-classes, particularly the two mentioned in this appendix, are still somewhat shakily supported, even more so than the rest of CSS. Use with caution, and assume that most people won't see them, rather than the other way around.
3.3 internal links
In making the web what it is, internal links are perhaps not as important as external links (3.4). However, they are more common. It is rare to find a web page without an internal link of any kind. More often than not, several pages are collected together into a web site, and the links between them are known as internal links.
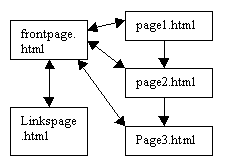
In this diagram the arrows represent internal links and thus the possible "moves" for users through this simple site: note that some move both ways, others only one, and not every page is connected to every other page.
All you need to include in the href attribute of an internal link is the name of the HTML file you're linking to (and don't forget the extension). This code would create a link which (on my site anyway) would return you to the Subject Index, a file called index_subject.html.
Return to the <a href="index_subject.html">Subject Index</a>.
If in any doubt, do refer back to the section on naming your HTML files (1.3).
 |
WARNING!. Please bear in mind the following. You do not need drive letters within the href attribute of an internal link. This is one of the most common errors made by inexperienced web designers; what's worse is that under some circumstances, certain HTML editors can insert this kind of thing as well (this is one of the things that happens if you save a file from within a browser window). You must observe the following convention in your HTML:
WRONG!! | <a href="M:myfile.html">
| RIGHT... | <a href="myfile.html">
<a href="nextfile.html"> |
The trouble with including drive letters is that they do not stop your site working when you're testing it on your local machine. But when you upload it, your visitors' computers have no idea what the M: drive is - and even if it's a more common drive letter like C: this won't work either as they're not reading the page from their C: drive - or even yours. They're downloading it from a server which is a different thing entirely. Don't include drive letters! Ever!
|
If the file to which you're linking is in the same folder as your original file, all you need is the filename. However, if you're using subfolders for whatever reason, include the name of that folder before the file name. For example, if you have a subfolder within your www folder called "images" and inside it is a file called "gallery.html", and you want to link to that from "menu.html" which resides in the top level of that folder, you would need a link like this in "menu.html":
<a href="images/gallery.html">See the photo gallery</a>
Note also that if you have links in "gallery.html" to other files in the subfolder "images" you would need only the filename again. But if you want to link back to "menu.html" from "gallery.html", you need to do the following:
<a href="../menu.html">Return to the menu</a>
The two dots .. are a standard way in computing of saying, "move me back up one level in the folder hierarchy". If you have too many levels, it can start getting confusing, so this is a good argument in favour of keeping your folders and subfolders simple. Do read section 3.8 below on basic navigation tips for more information on how to structure your site and therefore, your links.
3.4 external links
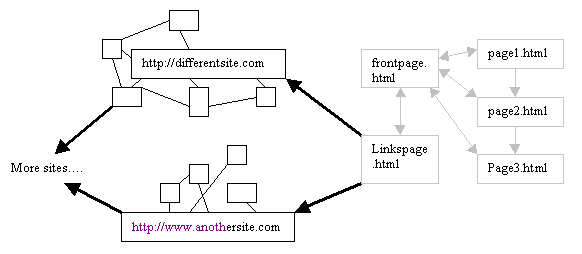
Just as the internal link turns a group of web pages into a web site, so the external link links up all these separate web sites into the World Wide Web, like so (the bold arrows representing the external links):
Here, though the links still point to other HTML files, they are nowhere near your root directory; they probably won't even be on the same server, or even the same continent. You therefore need the full URL within the href attribute. It is important that you include the "http://" prefix, as your links will not work if you omit it.
So, this code, for instance, would create a link to the home page of a certain football club over whom I have been known on occasion to get emotional:
<a href="http://www.seagulls.co.uk">the Brighton and Hove Albion web site</A>
You may already appreciate one of the disadvantages of "plain" external links like this one: that links work in only one "direction". I can link to BHAFC's site, but they have absolutely no reason to link back. Therefore, the reader has to use the "Back" function on their browser to return from whence they came. (A possible way round this is to make external links such as this open in a new browser window: see lesson 10.)
Because of this "unidirectionality", external links tend to go out of date quite quickly. Other people's web pages or sites move location, or disappear altogether. This is a great weakness of hypertext as currently implemented on the Web (and is discussed in more detail in the "hypertext" chapter of the printed booklet). An important part of maintaining your site should be to go through your collected external links every few weeks and make sure they are still working.
EXAMPLES:
Here are some more external links to do with web design. As this is a printer-friendly version they are not active links but you can always have a look at them via typing them into your browser's location bar.
- Vincent Flanders' Web Pages That Suck site at http://www.webpagesthatsuck.com/
- Lots of good buttons and icons (but also pop-up adverts) at http://www.snowdreamanimations.150m.com/buttons.htm
- http://javascript.internet.com/ is the JavaScript Source - the place for pre-written scripts for your web pages
- A guide to making your web pages accessible and viewable in any browser is at http://www.anybrowser.org/campaign/abdesign.html
- http://validator.w3.org/ - an HTML validation service: check that your pages have 100% correct HTML
The list above is a rough example of the most common and acceptable way to present external links; that is, collected together. In fact many sites devote a separate page to listing all the external links - a "links page". Not only does this make it easier for the reader, it also makes it easier to maintain, bearing in mind the warning above. This does somewhat contravene the principle of hypertext, and there's no reason why links can't be peppered throughout the document as well, but having a page which acts as a sort of "bibliography" does make for easier reading. More is said about this in 3.8 below.
3.5 mailto links
Most web pages contain some way of directly contacting the author. For commercial web pages, the benefits of this are obvious. There is not much point advertising your wares online if the readers then have no way of getting in touch with you in order to buy them. But the same applies, really, to any web page. Personal sites are also a form of advertisement, and without some link back to the author, the web "presence" is merely a disembodied ghost, rather than an online "avatar" of the page's author.
Sites that are informational or trivial might not seem to need such a link in the same way, but remember that all good communication is two-way. Just as links themselves make a reciprocal exchange of information possible, so the author of any page should always be prepared to receive feedback from their readers. (Of course, the creators of pornographic or hate-oriented sites would happily disregard this advice, but if the existence of such sites is to say anything productive, surely it should be as examples to be opposed.)
A simple way to do this is to use a mail-to link. When activated, instead of loading up a new HTML file it will transfer you to an e-mail program in order that you can send a mail to a specified address. (For more complex information, forms are usually used: mailto links are simpler to learn, but also limited in use. Forms do not come into this course until the Advanced Web Techniques option: in lecture 9, in fact.)
The tag/attribute combination is the same as for all other links: <a href="...">. Now, however, the href attribute has to contain the e-mail address to which you want the link to connect. It must be prefixed by mailto:, as follows...
<a href="mailto:bob@leeds.ac.uk">Click here to mail Bob</a>
Now, when the link is activated, it activates the designated mail client. Because Microsoft "bundle up" their Office software, in Internet Explorer the activated client will probably be Outlook Express; you can change this by going through Tools - Internet Options. If you have other browsers installed on your computer, you may have to set up a mail client yourself. Usually you would go through Edit - Preferences. It's not a particularly difficult task.
|
Are you saying that a mailto link is the only thing I need if I want readers of my site to be able to contact me?
It might be the only thing you need, particularly if your site is a personal one. But if your site is for a real organisation, or you in any way want a proper, official-seeming web presence, don't use a mailto link as your sole connection with the readership. Put at least a telephone number as well; and preferably, a full address of some kind, as here: This site was written by Drew Whitworth: e-mail address andrew [dot] whitworth [at] manchester [dot] ac [dot] uk. Dr. Drew Whitworth
School of Computing
University of Leeds
Leeds, LS2 9JT
U.K.
Tel: +44 (113) 343 5450 |
There is one disadvantage to putting your e-mail address on your web site. They are often "harvested" by spammers, you know, those nice people who send you e-mails advertising Viagra, Human Growth Hormone, get-rich-quick deals, etc etc. Spam is an insidious problem which seems to come and go in cycles. Whether it's excuse enough not to put your address on line is a decision you have to make.
3.6 anchor links
NOTE: the demonstrations in this section are impossible to reflect in print. If you want further clarification you should see the online version of this page at http://www.leeds.ac.uk/acom/webdesign/materials/subj_anchors.html.
You often see links on a web site which if you follow them, you appear to have jumped to a new web page. But in fact what has happened is that the link leads to an anchor point located elsewhere on the page. This kind of link is done with two <a> tags acting in conjunction. The first, the actual link itself, is almost the same as for the other link types such as internal and external links. In other words, it has text enclosed in opening and closing <a> tags and an href attribute which contains the destination of the link. However, in the demonstration link given above, href does not contain the name of another HTML file; nor does it contain a URL. It contains the name of the desired anchor point, prefixed by a hashmark (#) character. An example might be coded as follows:
You often see links on a web site like this one: <a href="#demo">a demonstration of anchor links</a>
This tells the browser to look for a named anchor point within the current HTML file. The name I have given the point is "demo". To actually give a name to a point in this way, you need to use another <a> tag. This is the only circumstance in which you ever see an <a> tag without an href attribute. Instead, use an alternative attribute, name. So, further down this samplee page might be the following tag:
<a name="demo"></a>
No text is actually being formatted here. All that is being "formatted" is a point on the page. (You can include a closing </a> tag as I've done; to be writing valid XHTML 1.0 you would at least need the slash at the end of the tag as with <br />, i.e., <a name="demo" /> is equally valid.)
| WARNING!. It's easy to forget the # character, or to mix them up (placing the # character in the name attribute but not in the associated href instead of the other way round). Your anchor link won't then work as the browser will expect the contents of the href to be a file name, not an anchor point name.
Although we first saw the # in the RGB colour codes (2.2), it is in fact more commonly associated with name attributes which, as we'll go on to see, have other applications in advanced HTML (see lesson 7 on image maps, for example). The best rule to remember is that name never takes the #. When you refer to a name from a different tag, you always need the #. |
Here's another example; and this is one of the most common pieces of formatting done on web pages. For good reason too, as it's very helpful. Every web page on this site has a named anchor point at the top called, with a leap of imagination, "top". So to enable readers to immediately return to the top of any page on this site, all I need is:
So to enable readers to immediately <a href="#top">return to the top</a> of any page on this site, all I need is:
On longer pages it is very helpful to have several of these spaced throughout the text, as this minimises the need to use the scroll bar. Combining this with a selection of anchor points located at the top of each page, and summarising the "highlights" thereon, produces what is effectively a "table of contents" for the page.
Finally, do note that you can combine references to named anchor points with other links. You may or may not remember that the page subj_styles.html (the pre-reading for lecture 2) had a "table of contents", as noted above. The four anchor points to which it referred are named "what", "first", "adhoc" and "cascade". If I wanted to jump from outside that page directly to, say, "ad hoc styles", I could not just put in href="#adhoc" as the browser would have looked for that named anchor point in this file. It's not here, so it would have done its best and taken me back to the top of this page. Not what was required at all.
When you want to jump directly to a named anchor point in a different file, do so by including the # and the anchor point name after the file name, for example:
<a href="subj_styles.html#adhoc">ad hoc styles</a>
Remember you still need the extension (.html) - the # comes after this. In principle, if you know that a particular external web page has anchor points in it, you can do the same with external links as well.
Anchor links are very useful and add a lot to the usability and navigability of web pages, particularly long ones. Often you see usability recommendations that you never put more than a screenful of content on one page and if that's the case, you'd never need an anchor link. But sometimes you just can't get away with writing short pithy pages (as on this site) and then they come into their own. At the very least, however, always include a "Back to the top" link at the bottom of your web pages. And now you know how to do it.
3.7 non-HTML links
A link does not necessarily have to point to an HTML file. Almost any file type can be used. Do bear in mind, though, that browsers will not necessarily be able to cope with all types. You are best off sticking with those listed on this page. What I haven't included here are more complex, interactive links such as those to JavaScripts and possibly CGI, as these need not only enhanced programming skills, but also some help from the server. Some information is provided in lesson 8 and lesson 9.
Those still feeling their way around web design might find much of this section difficult. The best way to use it is as a reference if you ever feel like putting one of these alternative file formats in your site. Remember that they all follow the same basic rule: if you want the file in your site, save it in the same place as all your other files. If you use subfolders, or are referring to alternative file formats on external sites, you will need to adapt your href attributes accordingly.
3.7.1 image files
Image files are discussed in detail in lecture 5 when we will also see how to use an image as a link. For now, it's worth mentioning that it's quite common to link directly to an image file without this image needing to be contained within an HTML file. For instance:
<a href="helvellyn1.jpg">View of Helvellyn from Striding Edge</a>
This is quite common practice when using thumbnails, but you should be wary of using it in the normal course of things, as one consequence of taking images out of the enclosure of an HTML file is that you cannot then include links back (your user will have to use the Back button on the browser), captions or ALT attributes. More about all of these things will come in lesson 5.
3.7.2 word/PDF files
Information that has already been encoded into an essay form, or other word-processed documents like brochures, can be linked to without having to convert it into HTML. Sometimes these files have been created in Microsoft Word. Again you can link to it just by including the filename (or URL) of the .doc file in the HREF attribute. (Save the file alongside the rest of your web pages: this goes for all the file types mentioned on this page.) And, in that URLs can be typed into these files and made "active" hyperlinks in their own right, Word documents can, in a way, be fairly seamlessly integrated into the WWW.
Another option is to use a file format developed by the software company Adobe: the .pdf file (short for Portable Document Format). Linking to such a page will cause the browser to activate Adobe Acrobat, a reader for this file, if that software is installed on the viewer's computer (see next paragraph). The .pdf was developed specifically so that complex, image-heavy documents, where presentation was important, could be displayed on the Web without having to "convert" to HTML. This is not only time-consuming, but also requires that some presentation be ditched or made less rigorous.
It is important, however, that you are aware of the issues here. Firstly, the files will be large (as you'll realise if you download the booklet). The whole point of HTML was to make presentation the choice of the reader, and not something that occupied bandwidth (download time) by being built in to the document. Also, .pdf files cannot be read without Adobe Acrobat being installed, and while many browsers do have that plug-in these days, many do not. It is never a good idea to depend on pieces of software being installed or, worse, forcing users to install them themselves, if they wish to read the full content of your page. My feeling is this: .doc and .pdf files should only be used, at most, to offer supplementary information to the main themes of your web site; restrict them to material that had already been written for print, with the assumption that your readers will end up printing them out themselves, rather than reading them online. In other words, they are a means of gaining access to printed materials - rather than presenting material in the medium that is the Web.
3.7.3 video files
Online video has been around for longer than you might think. The most common formats are .avi, .mov, .wmv and .mpg. As for the .pdf file, it may take special software (viewers such as RealPlayer) to view the file, but these are commonly bundled up into browsers these days. The problem with online video is that it takes a lot of memory, and therefore download time, to display even quite brief clips in anything resembling viewable quality; but as (if) broadband Internet connections become more common, online video may become more useful. Always make links to video clips optional, never force users to view them if they wish to make use of your page: also, always inform the user of the size of the clip in kilo-; or more relevantly, mega-bytes.
An interesting use of the Web is to show off small "home movies" made by budding film-makers, whether these are actual videos (or digital videos), or entirely "virtual" animated features. The band Radiohead had several such films created for their album Kid A. A menu of them is available from http://www.radiohead.sk/multimedia/video_blips.htm. This is still quite a primitive field though, and as I've said, depends on widely-available broadband connections to be worthwhile; something apparent when you compare the size of those Radiohead files with their duration in seconds. Check out the section on Web video (lesson 11) for more details.
3.7.4 audio files
Much the same applies here. The online "gallery" of sound clips is coming, to an extent, to replace the demo tape as the first recording medium of choice for budding Radioheads (especially now, thanks to corporate dominance, small independent rock venues like Leeds' old Duchess of York (RIP) are disappearing). Again, there's a section in lesson 11 about web-based audio files which looks briefly at some of the issues. Once again, just include the filename in the HREF attribute: .wav, .au, .mid and .mp3 are common formats here. The last, .mp3, is a little notorious these days for being the format most commonly exchanged in peer-to-peer musice exchange sites. while I don't want to get too deeply into the issues here, it's a salutary reminder to watch your back where copyright might be threatened by what you link to from personal sites. Once again, these files can also be very large for what you actually get; a minute of music can take ten minutes or more to download.
3.7.5 executable files
Finally you may want to place an .exe, or executable file on your page. This may be a program you want your readers to download, or, sometimes, a collection of files zipped up together by a program such as WinZip and made "self-extractable". (If all this is gobbledegook to you, don't worry about it - it's not the place of this course to start making people experts in all fields of computing - but this information might help those who already know about such things, but aren't yet aware of how to link this knowledge with Web Design.) Any file of this format, or indeed any other format (such as .sav, the file format relevant to the statistical package, SPSS), a box as pictured below will normally come up:
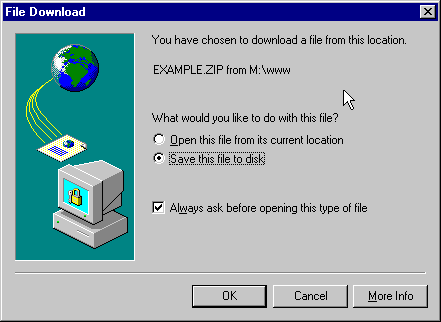
The user can choose where they want the file to be saved. The warning presented by this box is important, as this kind of thing is one possible means by which computer viruses can propagate. If your site offers this kind of download, do invest in a good virus checker program, and use it! The last thing you want is for a load of irate users to come back to you because your download has infected their computer! On the other hand, never download anything, particularly not .exe files, where you're at all unsure of the trustworthiness of the source. Any bona fide web page should have a full name and address for the organisation or individual responsible; if you can't find one, don't download.
3.8 navigation tips
There's a lot which can be said about this subject, as it is one of the most important and noticeable things when surfing the web - an activity which, after all, directly involves following links. More information can be found in the Web Design printed booklet and the lectures. Here, I only sketch out here some tips. They're worth thinking about, though!
In general terms, make all your links clear. This isn't simply a matter of making them stand out from the text; although that's obviously important. (Very dark coloured links on this site wouldn't have been helpful at all.) It's also a matter of ensuring that links are not hidden away in large clumps of text, almost as if the page's author is embarrassed about them. I've seen sites where almost half the content is accessible only from a tiny, almost invisible link to which the author draws no attention at all. It's like an important road junction which has no signpost on it. If you miss the turn, that's half the site made redundant, so display your links proudly! This was demonstrated in the lecture, but it's worth repeating.
Along with this, make sure the reader knows where the link will take them. URLs and/or filenames aren't always descriptive. So just putting click here isn't very helpful, particularly not if the URL (which will appear in the status bar) is also unenlightening. Add some form of textual description alongside your link, to let readers know why they might wish to follow a link, as well as where it's going to take them.
This is also an accessibility issue. You may have noticed that you can manipulate links via the keyboard: Tab will "focus" on each of your page's links in turn, and you can then press Return to follow the link. (It's in this circumstance that the a:active pseudo-class comes into operation: the reason I find this of little use is that this browsing technique is really only used by those with non-visual browsers for whom the style of the link is irrelevant.) For users unable to use a mouse for whatever reason, particularly those using non-visual browsers, this is how they will navigate around your site. For browsers like this, non-descriptive link text (e.g., "click here") is very little help as it will be "seen" out of context. See the section on non-visual browsers in lecture 6 for more details.
One answer is to add an attribute to your link, title. This provides a longer description for the link. For instance, we could have done the following:
<a href="http://www.moq.org" title="Work of Robert M. Pirsig: Metaphysics of Quality">http://www.moq.org</a>
Best of all though is to make your link text descriptive in its own right. But if you read the link text by itself, out of context, and can't work out where it'll take you, add a title.
With long pages - and that really means anything over a screenful - use "back to the top" links to minimise the need for the reader to use the scrollbar. If you feel it's appropriate, and on longer pages it usually is, include a table of contents at the top of the page, again, by exploiting anchor links.
Think about, research, and maintain your external links. If the concept of the "Web" is to mean anything at all then some happy medium needs developing between the sites which refer to nothing other than themselves, and therefore sit in little isolated pockets, not part of the Web at all - and at the other extreme, sites which are highly promiscuous with their links, supplying the user with dozens, many of which turn out to be broken or useless.
If you're thinking of putting an external link on your site, check the link out first!. That's so much better than simply finding a URL and bunging it on there, if the site at the other end is of poor quality, isn't actually about what you've said it's about, or is itself nothing more than an undiscerning collection of links. Be selective! The best "link pages" strike a balance between quantity and quality. Not always easy: but nothing good ever is! And as part of this enhancing of quality, do maintain your list of links, as I'll guarantee that about 5% or more of any set of links will go out of commission every month or so, as other sites move or disappear. It's a pain, but it's the way it is.
Ensure you plan the structure of your site. We talked about this in the lecture but here are the important points again. You will have a certain amount of material, so how is this material best divided up into separate pages? Remember - try and have one subject per page whenever possible. How are you going to move people between them? For a small site - five pages or fewer - I recommend you link every page to every other page. With such a small number, you might as well. Beyond this, you should think about a hierarchy of pages. An oft-quoted rule regarding navigation is the "three-click rule": no page of your site should be more than three mouse clicks away from any other page. It's one worth remembering.
Finally, do not create "dead-ends" on your site! Except in the case of links to non-HTML files, where it's unfortunate, but unavoidable, there are few things more irritating when browsing the web to end up stuck on a page that has no links out. At the very least you should return readers to whence they came. Yes, I know the "back" button is an option, but it's very bad web design to force readers to use it. It should always be just an option - and that means every page should have at least one link out.
The above will all suffice for a very simple level of web design, but if you are intending to take this at all seriously, you are strongly recommended to read the much more detailed discussion of good navigation and site structure contained in the course booklet. At the most basic level, do remember that you are writing your site to be read by others. Yes, the Web lends itself to random wanderings, but random wanderings will be just that - random - unless, at some point, some order is imposed upon the material. There is nothing wrong with guiding people through the forest of links, pointing out paths, and making preferred routes clear. That's what good, well-planned navigation will do.
End of lesson 3.
Material on this site is © Drew Whitworth and ACOM, 2002. Permission will usually be given to reproduce material from this site for non-commercial purposes, if credit is given. For enquiries, e-mail Drew at andrew [dot] whitworth [at] manchester [dot] ac [dot] uk.