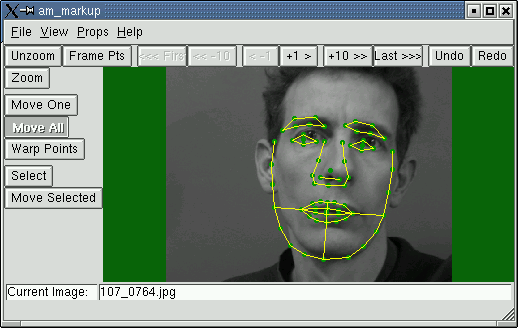
am_markup
A tool for interactive search with Active Appearance Models.

Invoke from the command line with
am_markup
or
am_markup xxxx
where xxxx.smd is an SMD file.
Loading a model
The filenames defining the various components of each model are
encapsulated by the SMD file.
To load in a model, either pass in the SMD file path as a parameter when
running the command, or use the "File->Load Model" menu option.
Loading images to search
To load a single image, use the "File->Load Image" menu item.
We are so often interested in sets of images, possibly with existing
annotations. The simplest
method of dealing with them is to set up a basic SMD file
listing the images of interest. This can then be loaded using the
"File->Load Image Set". The first image (and any associated annotation points
listed in the SMD file) will then be displayed. You can move through the
set using the arrow buttons above the main window.
This is the preferred technique when marking up a set of images, as the tool
can automatically create a suitable file name for any saved points.
Note: When you load in a model, the SMD file defines an initial set of
images, the first of which is automatically loaded.
Manipulating the Model
Because the AAM is a local search algorithm, the model must be started
in roughly the correct position. The buttons on the left of the main window
allow selection of a variety of interactions as follows:
- Zoom: Select a box to zoom in. Double click or hit the "Unzoom" button to display the whole image
- Move All: Dragging with the left mouse button translates the model, dragging with
the right mouse button rotates and scales the model about its centre
- Select: Press and drag to select all points in the resulting box
- Move Selected: As "Move All", but only affects selected points
- Move One: Click near a single model point to drag it around
Note that when you move individual points, they go red. This indicates they
are "Fixed" and will not be moved during the search. The assumption is that
if the user has moved them, they are moved to a particular desired location,
and the machine would not be so presumtios as to move them again. To
return them to a "Normal" state, use the buttons in the panel obtained
using the "Props->Point State" menu item. Note: When a new image is loaded,
all points return to a Normal state.

Searching with the Model
Use the "Props->Search" menu item to pop up a panel of search controls.

These allow you to define the parameters controlling the search (though
the defaults will usually work reasonably).
To run the search, simply press the "Search" button.
Search parameters
- Max. Level: The coarsest model resolution to use. Defaults to the coarsest model resolution available.
- Min. Level: The finest model resolution to use
- Max. Its: The maximum number of iterations to use at each resolution
- Forced Its: The number of iterations to run without checking that the predicted
step actually improves the match - setting to 1 or 2 has been found to be
useful for jumping out of local minima.
Saving Results
The current positions of the model points can be saved to a points file using the "File->Save Points" menu item.
When images are loaded using an SMD file, mechanisms exist for automatically
generating an appropriate file name (based on the image name) and saving the points.
Display Issues
The "Props->Graphics" menu item brings up a panel allowing control of
the graphics (line width, point radius etc)

- Displaying the results at each iteration can be enabled (but slows down the search).
- The "View Recon" button pops up a window showing the image with the current
model reconstruction overlaid on it. Note: This is only sensible when the
model is representing (and can thus synthesize) raw texture regions. It will
not work well if the model represents gradients or other more complex features.
Generating screenshots and video sequences
- "File->Save Screenshot" will save the image in the current window, together with any graphical overlays.
- Use the buttons provided to allow saving of every screenshot during a search,
so as to generate sequences of frames for videos.
- This can also be done with the reconstruction image.


