
This page describes how I build user interfaces, the issues discussed boil down into two groups, general good practice and personal preference (mine obviously).User interfaces are very hard to spec out before hand and tend to develop in an organic way. Therefore a lot of the things I do are in order to create code that is maintainable and easy to add/subtract and modify. Since this requires a little more effort by the developer I added a number of default UI code pieces to my emacs v-code-mode which saves a huge amount of time.
I hand code all my UI's. I only use the NE when I'm using an unfamiliar UIwidget or for forgotten the name of a parameter. It's far too tedious opening and closing parameters assigning values.
A word on performance. Since I have to maintain and often update code I'm more inclined to ease of design and addition than raw performance, (see Mario's performance document), but good design also means not using widgets unnecessarily, I'll point out issues that effect performance as I go.
I've done a lot of work that evolves modifying other peoples UI code and the first thing that strikes you it how on earth do I relate UIbutton#10 to the twenty buttons in the actual UI. Yes, OK you can refer to the label or title but that's only when looking at the source, and it's still tricky. What about when you have to poke around in the NE? Believe me its not fun. Please, I implore you rename widgets to something useful. Widgets like UIshell, UImod_panel can be left as there are generally only one of them, same goes for other containers if there is only one present. By default widgets with a label or title take their name from the Express objects name. This is fine in those cases, but I prefer to be explicit about the label and use a consistent naming method for all widgets. James' widget naming method goes as follows:
UIwidget UIdescriptionWidget e.g. UIbrowseButton, UIminSlider.
You can swap description and widget name if you like, but as with all programming consistency really helps. If you have a standard naming scheme and stick to it then you can work out what you called a widget in another file without necessarily having to go at look at it.
Rule 1, absolute values are evil! They should only be used as required e.g., top-left widget. Relative layout just means using small v-code expressions to calculate x, y, width and height. Relative coordinates have many advantages which outweigh the drawbacks:
Advantages:
Disadvantages:
Express has only the simplest auto-layout method, if y is unset add place the new widget after the last widget. This only works for vertical layout and not horizontal layout which is necessary as soon as you have anything more than a few widgets. Hopefully one day AVS will provide us with UIvertContainer, UIhorizContainer that will properly auto-layout widgets.
Firstly, think of an even number between 2 and 10. This is the basic spacing between widgets, lets call it w. I use 4 at the moment since I often have a lot of widgets to place but in the past I've used 8 which is a bit more roomy. It's up to you, but too big and you just waste screen real estate. Remember a number of the UIwidgets have a default border around them of a few pixels (its seems some are bigger than others, try changing the backgroundColor to see the extent).
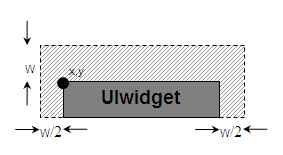
The other values that you need to make use of are .parent.clientWidth and .parent.clientHeight the dimensions of your widgets will be based on fractions of these especially .parent.clientWidth. Hopefully it all becomes clear with an example using 8 as our spacing value:
UIshell UImyShell;
UIpanel UImyPanel {
   x = 0;
   y = 0;
   parent => <-.UImyShell;
   width => parent.clientWidth;
   height => parent.clientHeight;
};
UItoggle UImyToggle {
   x = 4;
   y = 8;
   parent => <-.UImyPanel;
   width => parent.clientWidth -8;
};
UIslider UImySlider {
   x = 4;
   y => <-.UImyToggle.y + <-.UImyToggle.height +8;
   parent => <-.UImyPanel;
   width => .parent.clientWidth -8;
};
UIbutton UImy1Button {
   x = 4;
   y => <-.UImySlider.y + <-.UImySlider.height + 8;
   parent => <-.UImyPanel;
   width => parent.clientWidth/3 -8;
};
UIbutton UImy2Button {
   x => parent.clientWidth/3 +4;
   y => <-.UImy1Button.y;
   parent => <-.UImyPanel;
   width => parent.clientWidth/3 -8;
};
UIbutton UImy3Button {
   x => 2*parent.clientWidth/3 +4;
   y => <-.UImy1Button.y;
   parent => <-.UImyPanel;
   width => parent.clientWidth/3 -8;
};
UIframe UImyFrame {
   x = 4;
   y => <-.UImy1Button.y + <-.UImy1Button.height +8;
   parent => <-.UImyPanel;
   width => parent.clientWidth -8;
   height => parent.clientHeight -.y -8;
};
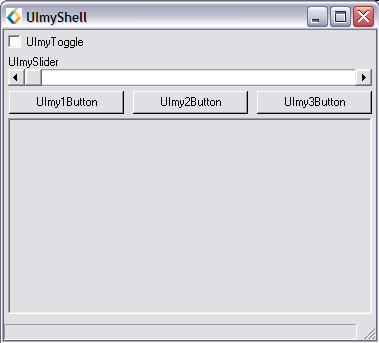
UIshell's should always have one child that is a UIpanel. Attaching widgets directly to the UIshell works under Motif but not under Windows, and the manual explicitly says not to do it. Obviously we want the UIpanel to fill the UIshell hence we make use of the parent's client dimensions.
As can be seen all but the first widget use a simple formula to set their y value:
y => <-.prev_widget.y + <-.prev_widget.height +spacing;
Of course if you have several widgets arranged horizontally (UImyXButton's) then it more optimal if you calculate the formula once and then share the results. Also you only have to change one y to move the row of widgets. The UImyXButton's use parent.clientWidth to arrange themselves neatly across the wide of the UIpanel.
Fun can be had when you find out that UIinteractors can be attached to any UI object not just UIrenderViews. So you can track to location of the mouse in a UIpanel, create a pixmap for a UIpanel add a UIonePoint and some v-code and you've got yourself a set of custom buttons. The only thing to note is that if you have the interactor connected to a container such as UImod_panel it won't update when the mouse passes over child objects such as buttons.
Here's a funky UItoggleButton as an example. However since this uses UIframe styles this won't work on win32 as only shadow_in is supported.
The height of widgets in Express are rather inconsistent and in the case of UIoptionMenu down right inaccurate. Below is an example templ.v to set them new defaults based on the lineHeight of the default font. I've set the values to be the minimum height required for each widget and made sure that letters such as 'g' aren't cropped (they currently are under some Motifs).
NOTE: Linux's Motif seems to require one less pixel that other's (I've only tested IRIX). If anyone can test this on Sun/HP etc I'd be grateful.
"$XP_PATH<0>/v/templ.v" Templates {
   // These are minimum height for widgets and are much more consistent and sensible
#ifdef MSDOS
   UI {
      UIlabel {
	 height => (UIdata.UIfonts[0].lineHeight + 2);
      };
      UItoggle {
	 height => (UIdata.UIfonts[0].lineHeight + 2);
      };
      UIfield {
	 height => (UIdata.UIfonts[0].lineHeight + 6);
      };
      UItext {
	 height => (UIdata.UIfonts[0].lineHeight + 6);
      };
      UIbutton {
	 height => (UIdata.UIfonts[0].lineHeight + 8);
      };
      UIoptionMenu {
         // Less than 10 causes options to go missing!
	 height => (UIdata.UIfonts[0].lineHeight + 10);
      };
   };
#else
   UI {
      UIlabel {
	 height => (UIdata.UIfonts[0].lineHeight + 0); // AVS' default
      };
      UItoggle {
	 height => (UIdata.UIfonts[0].lineHeight + 0);
      };
      // IRIX (others?) seems to require an extra pixel so not to obscure 'g' etc.
#ifdef xp_linux
      UIfield {
	 height => (UIdata.UIfonts[0].lineHeight + 8);
      };
      UItext {
	 height => (UIdata.UIfonts[0].lineHeight + 8);
      };
#else
      UIfield {
	 height => (UIdata.UIfonts[0].lineHeight + 9);
      };
      UItext {
	 height => (UIdata.UIfonts[0].lineHeight + 9);
      };
#endif
      UIbutton {
	 height => (UIdata.UIfonts[0].lineHeight + 6);
      };
      UIoptionMenu {
	 height => (UIdata.UIfonts[0].lineHeight + 6);
      };
   };
#endif
};